When it comes to photographing my beadwork for AroundTheBeadingTable.com, I often end up with an annoying color cast even when I photograph the jewelry using a light box, turn off the flash, use an Ott-Lite for lighting and fiddle with the settings on my digital camera. I have found that the quickest and easiest way to get rid of that color cast is to convert the image to Lab mode in Photoshop and tinker with it there.
Photoshop allows you to work in several different color modes. RGB is the most common and uses a red (R), green (G) and blue (B) color model that is best employed for the Web, although most graphic artists work in RGB mode in Photoshop and then convert to CMYK mode as a last step before going to print. RGB is often called the color model of light because it does not exist in any other form except what you see displayed on a monitor, television or digital device.
CMYK color mode uses a cyan (C), magenta (M), yellow (Y) and black (K) color model and is best described as the color of pigment (ink or paint or whatnot) reflected on a page or canvas. Think of RGB as the colors projected by a slide or movie against a wall and CMYK as the paint on the wall.
Lab Color mode was created as a color mode independent of both light (RGB) and pigment (CMYK). It consists of a luminance—or lightness—component (L) and two other components: a green to red spectrum (A) and a blue to yellow spectrum (B).
First, Open your image in Photoshop:
Convert it to Lab mode by going to the Image menu, select Mode and in the drop-down menu that appears, scroll down and select Lab Color:
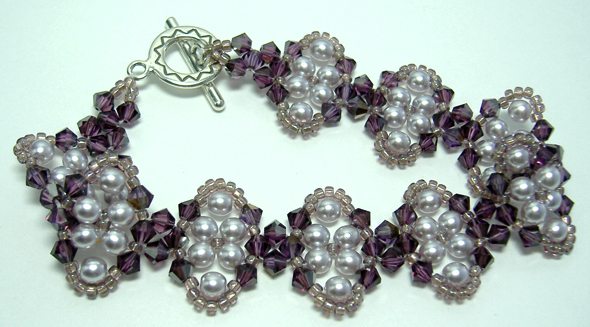
For me, this photo had way too much green in the background and that's what I want to get rid of. What makes Lab Color mode so fantastic is that you do so without drastically affecting the other colors in the bracelet.
First, bring up the Levels dialogue box by going to the Image menu, selecting Adjustments and in the drop-down menu that appears, select Levels (or just use the shortcut—command-L on a Mac and Control-L on Windows):
At the top of the Levels dialog box, next to the word "Channel" there is a drop-down menu. Since we want to get rid of the green, scroll down to "a", which is the green to red spectrum (A), and click OK:
Notice that the histogram has changed. Now move that middle triangle to the right and the green in the background will start to change color. Click OK. Note, if the color cast were blue, you would select the "b" channel:

Now I want to get rid of the background altogether. Bring up the Levels dialog box again: command-L on a Mac and Control-L on Windows. Keep the "Channel" on "Lightness". Move the white triangle to the right and the rest of the background will disappear. Click OK:
Convert back to RGB Color mode (go to the Image menu, select Mode and then RGB Color) and compare before:
and after:
